
Top Tips to Make Money with Google AdSense

How To Install Kali Linux Full Procedure Step by Step Explanation


How To Install Kali Linux

For this tutorial we must have to download Kali Linux ISO files and we must have bootable pen drive in which ISO file is extracted/ Burn DVD of Kali Linux, Which is not covered in this post. So, in this post, we learn how to install Kali Linux on the system. So, restart your Pc/Laptop and then open boot menu by pressing the F12 button. In the boot menu, you have to select “DVD/ USB Drive” option. After this, Kali boot menu is open and then you have to click on Graphical Install.


Clicking it will ask you to select languages then select the language as per your preference. Here I’ll select English.

After this, select your country and click on “continue” button. Then it will ask you to set ‘hostname’. “Kali” is the default hostname but you can also change it simply by typing the new name in the box. And it is more appropriate to set it to default i.e. “Kali”.

Click “continue”. Then it will ask you to set a domain name.  You have to click “continue” by leaving it blank. After this, it will ask you for password then type any password which you remember easily. Click “continue”. Then it will ask you to select portioning method and you have to select “manual”.


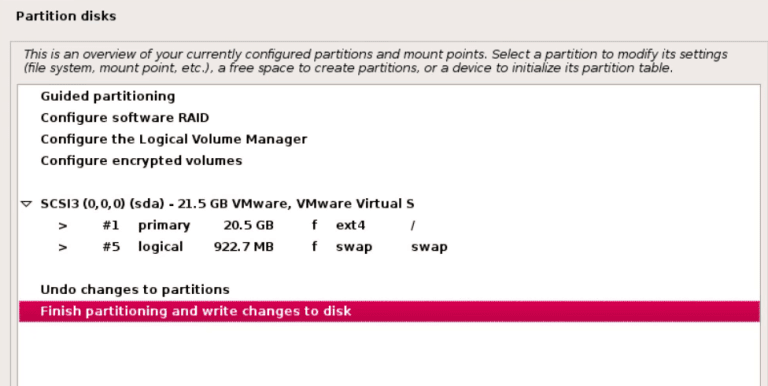
Then select all files in “one partition” option to keep all files in one partition. After that, you have to select the drive in which you have to install it. You can analyze it by seeing its size in the middle of the drive name as you can see in the image given below. Select the drive and click “enter” on the drive. Select the first option to make your drive “ext 4journalism”.  Click “/” type of option and then your partition work is finished .then select “Finish partitioning setting” and click “continue”.


After that, it will ask you to erase all the data from this partition & click “continue” and all the data from partition will be erased. Then it will ask you “write changes to disk?” and you have to select “yes”. It’ll take more than half an hour to complete the installation process.  After completion, it will ask you to install “Network mirror”, click “yes” and continue.


NOTE! If you select “NO” on this screen, you will NOT be able to install packages from Kali repositories
After its installation it will ask you to install GRUB Bootloader then click “yes” and then continue. Then it will ask for the location the select on the second option.


Finally, Kali Linux is Successfully Install on the hard drive. Now, the computer will be restart automatically.  It will ask you to enter username and password “so you have to type “root” (it is default)  in the “username” and in place of “password” you have to write password which you gave at the starting of the installation of Kali Linux and in case you didn’t give any password then type “toor”(it is default).

Comments

Popular posts from this blog

PhoneGap Beliefs, Goals, and Philosophy

This article seeks to clear up misunderstandings about the goals of PhoneGap. Our goals are wrought from our beliefs, and development philosophy. Understanding a free software project, like PhoneGap, requires more than knowledge of the implementation details. It requires understanding the individuals behind the code. Knowing the people and what motivates them inform you more about whether the technology is right for you, your goals, and the people you work with. The world is diverse and very often this comes across in our code, and the tools we use to write it. Background PhoneGap was born at Nitobi Software in the summer of 2008. Nitobi was very much a web

Merge two whatsapp database into one.

Many people want their whatsapp message history(backup’s from different devices ) to be in the same device that they are using. Specially me , I don’t want to lose any of my messages. So hears for those peoples. I will be as clear as possible, you can ask any query if you cant understand, There you go. 1). Open the old database file in SQLite Database Browser (  http://sqlitebrowser.sourceforge.net/  ). Open the table messages in Browse Data. Press the Button ” > ” as often as necessary to get to the last page. Scroll down to the last message. Now write down the number (_id) of that last message, e.g. 65422 2). Now open the new database file in SQLite Database Browser. Open the table messages in Browse Data. Click on the first entry (which has most fields with value “-1”). Click on Delete Record. Have a look at the now first entry and write down the number (_id) of that first message, e.g. 12 Now Click on Execute SQL and execute the following SQL state...

Simple Steps To Become A Grate Hacker

Hacking is an engaging field but it is surely not easy. To become a hacker one has to have an attitude and curiosity of learning and adapting new skills. You must have a deep knowledge of computer systems, programming languages, operating systems and the journey of learning goes on and on.  Some people  think that a hacker is always a criminal and do illegal activities but they are wrong. Actually many big companies hire hackers to protect their systems and information and are highly paid. We have prepared a list of some  most important  steps necessary to become a good hacker, have a deeper look